The Golf Code

Secrets To A Perfect Golf Shot
Most golfers including professionals are unaware that the instant you grip a golf club, whether that of an overlapping, interlocking or baseball type of grip, your wrists and in turn, the face of your club, will be rotated into a “free-fall’ state. This means your wrists and club face will “free-wheel” to and through various golf shot alignments in response to any movement of your feet, arms, shoulders, etc. after gripping your club – unless and until you lock-in a straight or specifically shaped golf shot alignment.
By the time you complete your set up proceedings, your wrists and club face could be rotated to a fade, draw, push, hook, slice, pull or even worse, to a push-slice or a pull-hook alignment when in a “free-fall” state – without providing a clue as to which alignment. You will observe the “free-fall” phenomenon at almost any practice range you visit where golfers will slice their ball with one swing and hook their ball with their next swing while swinging their club the same way each time. They simply fail to rotate their wrists and in turn, the face of their club,out of their “free-fall” state before hitting their golf shot. The reason for this “free-fall” phenomenon is the right hand is gripped on a club handle below the left hand (for right-handers) which misaligns the wrists and in turn, the face of a club, in relation to the shoulder, elbow and hip lines.
Unfortunately, it doesn’t matter how many knuckles are shown on your right hand or in which direction your thumbs point in relation to your right shoulder when gripping your club in a conventional manner. Your wrists and in turn, the face of your club, will remain in a “free-wheeling’ state.
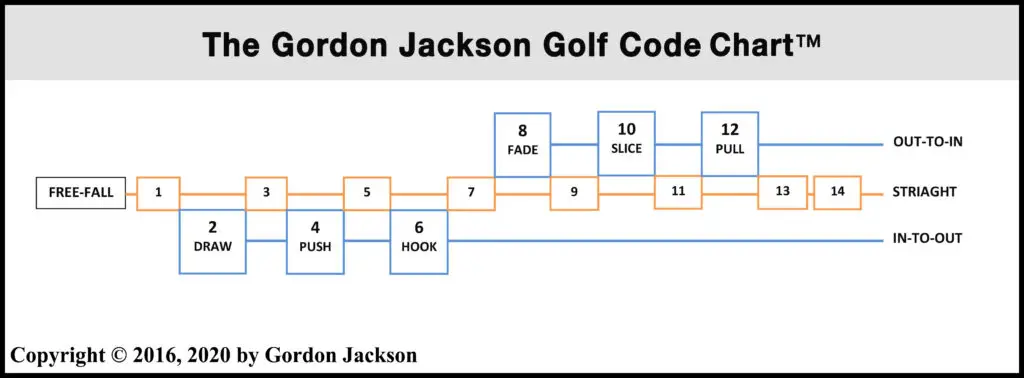
So, how do you rotate your wrists and club face out of their inherent “free-fall” state and lock-in a straight or specifically golf shot alignment you desire? There are two ways to accomplish this feat. You can use either the GOLF CODE™ techniques or LOCKED-IN GOLF® techniques to rotate your wrists and club face out of their inherent “free-fall” state and lock-in a straight or specifically shaped golf shot alignments, such as an intentional draw, fade, push, hook, slice or pull golf shot alignment. The GOLF CODE™ reveals how the wrists and in turn, the face of a golf club, will rotate incrementally across a continuum of alignment zones and lock-in a straight or different shaped golf shot alignment at different alignment intervals in response to “releasing and redocking” your thumbs and fingers from your gripped club in four specific ways. The alignment zones of the GOLF CODE™ as referenced on the Gordon Jackson Golf Code Chart™ and shown below – beginning with the “free-fall” zone.
Each time you “release and redock” your grip in the following ways (without completely un=gripping your club) you will rotate your wrists and in turn, the face of your club, to the next alignment zone of the “CODE” which will lock-in a straight or specifically shaped golf shot alignment in relation to your shoulder and elbow lines:
- Release your right thumb fully from your club handle and then
redock it back onto the club handle – immediately after gripping
their club. - Release your right-hand lifeline fully from your left thumb and then
redock it back onto the left thumb – immediately after gripping their
club. - Release your unrestricted fingers of your left hand fully from the
club handle and then redock them back on the club handle –
immediately after gripping their club. - Release your unrestricted fingers of your right hand fully from the
club handle and then redock them back onto the club handle –
immediately after gripping their club. (The same occurs for left-
handed golfers when the term “right” is changed to “left” and “left”
is changed to “right.”)
I refer to these actions as “Locking Mechanisms.” Sometimes, I refer
to them simply as the four “Locking Levers.”
Each “release and redock” of a “locking-lever” will rotate the wrists and club face out of their inherent “free-fall” state and lock-in a straight or specifically shaped golf shot alignment in relation to the shoulder and elbow lines at each particular alignment zone in reference to the GOLF CODE™ as shown on the Gordon Jackson Golf Code Chart™ below.
For example, if you release your right thumb fully from your club handle and then redock it back on to your club handle firmly and securely after gripping your club with a conventional grip, your wrists and in turn, the face of your club will rotate out of their inherent “free-fall” state and lock-in a straight golf shot alignment at the first alignment zone of the “CODE.”
If you then release your right thumb fully from your club handle and then redock it back on to your club handle firmly and securely after gripping your club with a conventional grip a second time, your wrists and in turn, the face of your club will rotate out of their inherent “free-fall” state and lock-in a draw golf shot alignment at the second alignment zone of the “CODE.”
Each “release and redock” of a “locking lever” thereafter will rotate and lock-in a respective straight or specifically shaped golf shot alignment at the next alignment zone of the “CODE” such as to a straight alignment at the third alignment zone, a push alignment at the fourth alignment zone, a straight alignment at the fifth alignment zone and so on. Each “release and redock” of a “locking lever” works like a ratchet wrench. It locks in a specific golf shot alignment in response to each “release and redock” and will not rotate out of such alignment until there is a subsequent “release and redock.” You should observe that when you “release and redock” a locking- lever” to rotate and lock-in a straight golf shot at an odd-numbered alignment zone of the “CODE” – at the first, third, fifth, seventh, ninth and eleventh alignment zones – you will lock-in a straight golf shot alignment in relation to your shoulder and elbow lines. (However, fifty percent odds do not bode well in winning bet and tournaments)
On the other hand, when you “release and redock” a locking-lever” to rotate and lock-in a straight golf shot at an even-numbered alignment zone of the “CODE” – at the second, fourth, sixth, eighth, tenth and twelfth alignment zones – you will lock-in a shaped golf shot, such as a respective draw alignment at number two, a push alignment at number four, a hook alignment at number six, a fade alignment at number eight, a slice alignment at number ten and a pull alignment at twelve.
Although most professional and low-handicap golfers are unaware of the “free-fall” phenomenon or the GOLF CODE™ (at least as of this writing), they instinctively and unknowingly “release and redock” one or more of the “locking levers” after gripping their club to rotate their wrists and in turn, the face of the face of their club, out of their “free-fall” state. (Otherwise, they would not be professionals and low-handicappers.) If you observe the hands of professionals during their set up routine at any tournament, you will notice them “releasing and redocking” one or more “locking levers” one or more times.
The problem is that unless they know the “CODE” they do not have a clue as to how many “releases and redocks” it takes to rotate their wrists and club face to the alignment zone consistent with the golf shot they desire.
Consequently, they are likely to rotate their wrists and club face to lock-in a shaped golf shot alignment, such as a draw at number two, a push at number four, a hook at number six, a fade at number eight, a slice at number ten or a pull at number twelve, instead of to and even-numbered alignment zone, and curve their ball to the left or right of their target.
How many more tournaments, including majors, would have professional golfers won previously had they only known how many “releases and redocks” of a “locking lever” it would have taken to rotate and lock-in the precise golf shot needed each time they drew a club from their set?
On a personal note, how many bets and rounds of you would you have won previously had you only known how many “releases and redocks” of a “locking lever” it would have taken to rotate and lock-in the precise golf shot needed each time you drew a club from their set? There are four reasons why professional and other golfers who instinctively “release and redock” one or more of the “locking levers” fail to rotate their wrists and club face to lock-in a straight or specifically shaped golf shot alignment.
One, they fail to release their “locking lever” sufficiently enough before redocking it back onto its base. If you do not release a “locking lever” fully before redocking it on to its base immediately after gripping your club, your wrists and your club face will remain in their inherent “free-fall” state. (I suggest each “locking lever” should be released by at least an inch before being redocked on to its base.)
Two, they “release and redock” a “locking lever” too many times when attempting to lock-in a straight golf shot alignment and rotate their wrists and club face in to an even-numbered alignment zone, instead of to an odd-numbered alignment zone of the “CODE.” As a consequence, they lock-in either a draw alignment at the second zone, a push alignment at the fourth zone, a hook alignment at the sixth zone, a fade alignment at the eighth zone, a slice alignment at the tenth zone or a pull alignment at the twelfth zone, in reference to the “Chart” as shown below.
Three, they prematurely move some body part, such as moving their feet in some way immediately before “releasing and redocking” a “locking lever,” As a consequence, they most likely will rotate their wrist and club face in to one of the even-numbered alignment ones of the “CODE” and lock-in a shaped golf shot alignment, instead of in to an odd-numbered alignment zones of the “CODE.” The “release and redocking” of a “locking lever” must occur immediately after gripping your club and before any other body part is moved in any manner. Four, they fail to perform the Re-Sync Maneuver to re-align their hip line parallel with their shoulder and elbow lines in order to lock-in a straight golf shot alignment at one of the even-numbered zones of the “CODE.”
So, allow me to share with you about the Re-Sync Maneuver and why it is critical when using the GOLF CODE™ techniques. In order to hit a straight golf shot, your shoulder, elbow and hip lines must be aligned parallel with each other and also parallel with your target line with the sweet spot of your club face centered directly behind your ball on your target line, followed by a “steady-head/eyes focused” golf swing. Although the LOCKED-IN GOLF ® techniques lock-in a straight or specifically shaped golf shot in relation to the shoulder, elbow and hip lines,
the GOLF CODE™ techniques lock-in a straight or specifically shaped golf shot only in relation to your shoulder and elbow lines. When you are hitting golf shots from an even surface, your hip line naturally will adjust to a parallel line with your shoulder and hip lines. However, rarely will you find an even ball lie in a round of golf. Therefore, in order to adjust for any uneven ball lie when using a GOLF CODE™ technique you must perform the Re-sync Maneuver to re- align your hip line parallel with your shoulder and elbow lines. Incredibly, the Re-Sync Maneuver converts any uneven ball lie “effectively” to an even ball lie.
The Re-Sync Maneuver cures the cross-over phenomenon that occurs when a golf club crosses over to another alignment during the golf swing and flights the ball in the opposite direction from the one intended. I recommend you perform the Re-Sync Maneuver after locking-in the golf shot alignment you desire whether in play or practice by using a GOLF CODE™ technique because you will rarely find an even ball lie on any tee box or fairway – or even on a practice mat that has been worn by feet impounding on one part of the mat in relation to the ball on another part of the mat.
I instruct precisely how to perform the Re-Sync Maneuver in THE GOLF CODE book. Unlike the GOLF CODE™ techniques that only lock-in a straight or specifically shaped golf shot in relation to the shoulder and elbow lines, the LOCKED-IN GOLF ® techniques lock-in a straight and specifically shaped golf shots in relation to the shoulder, elbow and hip lines.
Since the shoulder, elbow and hip lines would be locked-in parallel to each other at the completion of the technique, there is no need to perform the Re-Sync Maneuver when using the LOCKED-IN GOLF ® techniques. I have developed more than 100 LOCKED-IN GOLF ® techniques to rotate your wrists and in turn, the face of your club, out of their inherent “free-fall” state and lock-in a straight golf shot alignment in which your shoulder, elbow and hip lines will be aligned parallel with each other. (The instructions for many of these techniques are addressed in the LOCKED-IN GOLF ® books and video sets that are available on this website.) In addition, I have developed more than 30 techniques each to lock-in and hit a perfect fade, power draw, phenomenal push, remarkable hook, fantastic slice and a sensational pull type of golf shot.
In each of these LOCKED-IN GOLF ® techniques, a certain body part is moved in a specific manner to an exact extent immediately after gripping your club, or between the time of gripping your left hand and your right hand on a club, which in turn will rotate your wrists and club face out of their inherent “free-fall” state and lock-in a square alignment and an “on line” swing path in relation to your shoulder, elbow and hip lines.
Instructions for many of these LOCKED-IN GOLF ® techniques are available in books and video sets on this website. So, how do you get started in using the GOLF CODE™ and LOCKED-IN GOLF ® techniques? I suggest you begin with the “Triple Play” Introductory Package:
Triple Play Introductory Package
The “Triple Play” Introductory Package consists of:
- THE GOLF CODE book along with its companion video set, the Golf Code Techniques 7-Video Set;
- the ABOVE THE CODE book along with its companion video set, the Above The Code 5-Video Set
- and the TOO SIMPLE TO BE GOLF book along with its companion video set, the Audacious Techniques 7-Video Set.
THE GOLF CODE book and the Golf Code Techniques 7-Video Set will provide you with all you will ever need to know about the “Code” because “if you don’t know the Code, you don’t know golf.”
They also will teach you how to perform the Re-Sync Maneuver and all the set-up proceedings necessary to hit laser-straight golf shots – as long as you then execute a “steady-head/eyes focused golf swing.
The ABOVE THE CODE book and the Above The Code 5-Video Set will provide you with five techniques to lock-in a straight golf shot alignment with just one magical move immediately after gripping your club. They will provide the detail instructions to perform different tests to determine whether you have rotated your wrists and club face out of their “free-fall” state as well as the Arrow Alignment Technique by which to align your shoulder line parallel with your target line.
They also provide you with all the set-up proceedings necessary to hit laser-straight golf shots – as long as you then execute a “steady-head/eyes focused golf swing. (The Re-Sync Maneuver is not required when using the ABOVE THE CODE techniques.)
The TOO SIMPLE TO BE GOLF and the Audacious Techniques 7-Video Set provide you with:
- just one magical move to lock-in and hit an intentional draw golf shot;
- just one magical move to lock-in and hit an intentional fade golf shot;
- just one magical move to lock-in and hit an intentional push golf shot;
- just one magical move to lock-in and hit an intentional hook golf shot;
- just one magical move to lock-in and hit an intentional slice golf shot;
- just one magical move to lock-in and hit an intentional pull golf shot and
- just one magical move to lock-in and hit a straight golf shot.
They teach you how to lock-in and hit any golf shot you will ever need in a typical round of golf.
They also provide you with all the set-up proceedings necessary to hit shaped and straight golf shots – as long as you then execute a “steady-head/eyes focused” golf swing. (The Re-Sync Maneuver is not required when using the TOO SIMPLE TO BE GOLF techniques.)
The “Triple Play” Introductory Package is now available on a limited-time basis at $97.00 – which is 30% off the regular price if all items are bought separately.